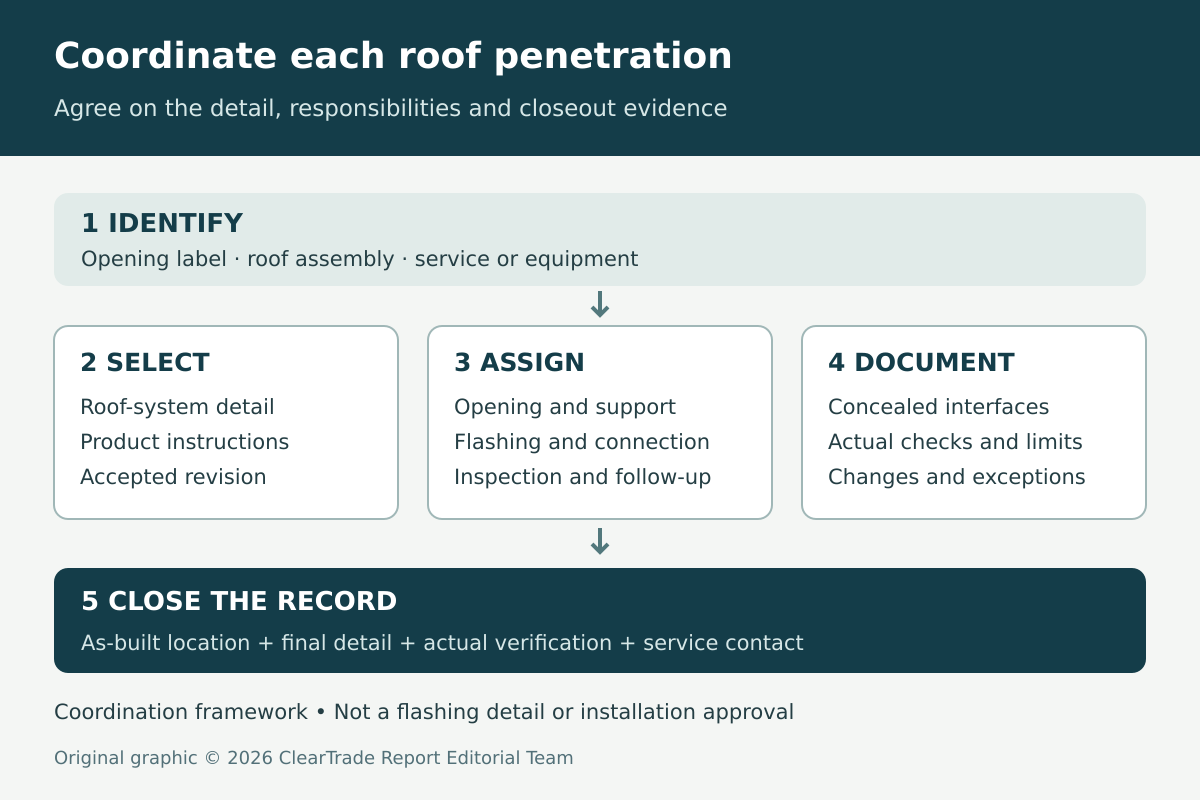
Before a new pipe, duct or equipment curb goes through a roof, request a coordinated detail for the actual roof assembly and service. The handoff should identify the opening, compatible flashing system, structural support responsibility, installation sequence and final inspection evidence. A quote that says only “seal penetration” leaves too much undecided.
This guide is an owner and project-team documentation framework. ClearTrade has not inspected a roof, tested a flashing product or obtained outside professional review. It does not supply a universal flashing recipe, fastener schedule, curb height or approval for an unseen installation.
Identify the roof and the service before choosing a detail
Create a penetration schedule with a unique label for each opening. Record its location on a roof plan, service purpose, existing or proposed condition, approximate dimensions for coordination and the person responsible for confirming final dimensions. Keep plumbing vents, equipment ducts and other services distinguishable rather than grouping everything under “roof pipe.”
Ask the roofing provider to identify the existing covering or membrane and the assembly being disturbed. Obtain available installation, repair and warranty records. If the roof system cannot be identified, make investigation an explicit task before someone selects a compatible-looking accessory.
The Building America guide to existing-roof penetrations emphasizes continuity of the water-control layer and integration of flashing with the roof assembly. Its illustrated retrofit includes above-deck insulation; it is an example, not a detail to copy onto every roof. The useful owner question is where the new work connects to the existing water-control layers.
Ask for a marked section or manufacturer detail showing that connection. A photograph of a boot sitting on the roof may document a component without documenting the concealed interface. Record which details require observation before covering and who will supply those photographs.
For pipe boots, request the application limits
Have the installer name the pipe or service, actual outside dimensions, roof covering and proposed flashing product. Ask for the product instructions and the roof-system detail that together cover the application. The word boot is a component description, not proof that the selected item suits every pipe, roof slope or service condition.
Request a written answer to the compatibility question: which documents support the flashing, attachment and sealing materials used together? If a proposed service has temperature, movement or clearance requirements, ask its responsible trade to identify them. Do not treat a plumbing-vent example as approval for a combustion vent or other different service.
Make the scope of a repair clear. Is the contractor replacing the entire flashing assembly, replacing a compatible component, or applying a temporary measure? Ask which surrounding materials must be disturbed and restored, and whether the provider has evaluated damage outside the immediately visible seal.
Do not use this checklist to climb onto the roof or pull materials apart. Request an inspection and documented explanation from the responsible provider. If the proposed solution differs from the identified instructions, ask for the applicable project-specific resolution before approving the substitution.
For curbs, separate equipment fit from roof integration
A curb submittal should connect the selected equipment to the roof detail. Request the equipment model, curb identity, opening dimensions, roof slope and orientation, finished roof assembly and support information. Identify who confirms each dimension before fabrication and before the opening is made.
Greenheck’s GPI product page, for example, identifies a straight-sided curb for flat roofs with an integral wood nailer. That limited description demonstrates why the exact curb model matters; it does not establish that this product fits your equipment or project.
Greenheck’s Roof Curbs, Extensions and Equipment Supports catalog, November 2019, distinguishes nominal curb-cap dimensions from actual curb dimensions. Its typical installation also separates adequate structural support, field flashing and the curb-to-fan seal. It specifically directs rubber-roof installations to the roof manufacturer and specialty/high-wind curbs to additional details.
Use those distinctions as questions for the provider, not as a current project specification. A curb that fits an equipment base has not thereby established the supporting structure or the roof flashing design. Ask the responsible designer and installers to reconcile those interfaces in one coordinated submittal.
Where an existing curb is retained, request its measured condition and the basis for reuse. Record whether an adapter is proposed, which connections it changes and who accepts the completed assembly. “Reuse existing” should not hide an unresolved fit, support or waterproofing question.
Use details for the identified membrane system
Carlisle’s accessories overview distinguishes fabricated accessories for TPO/PVC systems, pressure-sensitive accessories and flashings for unusual penetrations or dissimilar-system connections. These categories are evidence that accessory selection is system-specific; they are not an interchangeability chart or an endorsement of a proposed mixed assembly.
For a membrane roof, request the exact membrane identity, flashing detail number and revision, accessory identities and required supporting documents. Ask which provider verifies that the chosen combination is acceptable for the existing roof and any applicable warranty conditions.
A general equipment manual and a roof-system detail can address different sides of the same junction. If they appear inconsistent, assign the conflict for resolution before construction. Keep the written answer with the submittal. Do not let the crew resolve a missing detail by quietly replacing the specified materials with whatever is on hand.
Document approved changes by opening label. A revised detail for one penetration should not silently become the default for all the others. Maintain the earlier revision as history so the owner can tell which detail was actually built.
Make the trade handoffs explicit
Use a responsibility table before scheduling the work. Each row needs a named company or person, not simply “by others.” One contractor may perform several tasks, but the scope should still identify them separately. The following table is ClearTrade’s coordination template, not a prescribed division of labor.
| Handoff | Decision to assign | Evidence to retain |
|---|---|---|
| Service layout | Who confirms route, location, dimensions and service requirements? | Marked plan and equipment/service submittal |
| Opening and support | Who evaluates structure and authorizes the opening? | Applicable design and approved location |
| Weatherproofing | Who selects and installs the roof-system detail? | Detail revision, materials and concealed-work photographs |
| Equipment connection | Who verifies the equipment-to-curb or service interface? | Applicable instructions and completed connection record |
| Closeout | Who inspects, documents exceptions and owns follow-up? | Dated acceptance and unresolved-item register |
Discuss temporary weather protection as its own task. Ask who is responsible while the roof is open, what conditions trigger postponement and how an incomplete opening is secured between trades. A schedule saying that the roofer will return later is not a complete protection plan.
Also assign access, roof protection and cleanup. Ask how equipment will be brought to the work location and who coordinates the work with occupants. These are planning requests; the provider must establish the safe work method and any required permits or inspections for the address.
Review three common coordination gaps
New service after reroofing: The mechanical proposal assumes a future opening while the roofing scope assumes an untouched roof. Ask both providers to identify the same opening on the same plan, confirm the applicable detail and agree who returns to complete and inspect the interface.
Equipment replacement on an old curb: The equipment base dimensions appear compatible, but the condition of the retained curb and roofing connection is undocumented. Ask for the reuse evaluation and any adapter detail. Separate what is retained from what is renewed so the closeout does not imply that all components are new.
A leak repair described only as resealing: The proposal does not distinguish the observed symptom from the failure mechanism or define the repair boundary. Request the provider’s findings, limitations and reason for the proposed work. Retain before-and-after evidence without assuming that one surface treatment addresses concealed damage.
These are hypothetical scope examples. They are not diagnoses of any particular leak, a reason to reject every repair, or a claim that a new penetration always requires complete roof replacement. The purpose is to make the unanswered question visible before the work is treated as complete.
Keep a penetration closeout record
Use the same labels from the roof plan in the photographs, submittals and inspection notes. The owner should be able to connect one completed opening to its service and its governing detail without guessing from an unlabeled collection of pictures.
| Record item | What to request |
|---|---|
| Final location and identity | As-built roof plan and equipment/service labels |
| Applicable detail | Final revision, product identities and accepted changes |
| Existing conditions | Findings, repair boundaries and retained components |
| Installation evidence | Dated photographs of required concealed and completed interfaces |
| Verification | Who checked what, applicable method, results and limitations |
| Open items | Responsible provider, corrective work and dated follow-up |
| Owner information | Care instructions, warranty documents and service contact |
Ask which checks the provider will perform and document under the applicable detail and project requirements. This guide does not prescribe a hose test, flood test or universal acceptance method. A photograph documents what it shows; it should not be relabeled as proof of a test that did not happen.
Read workmanship, equipment and roof-system warranties separately. Ask how the new work affects existing coverage and obtain the actual written terms. Our roof warranty guide explains why the coverage type and responsible party matter.
Plan for future service and changes
Ask how future maintenance or equipment replacement can be carried out without leaving the roof interface unassigned. Keep the approved detail and service contact with the building’s equipment records. Where access to a connection is limited after equipment is set, request the intended inspection and documentation sequence in advance.
When a later trade changes a pipe, support, curb or equipment base, reopen the coordination record. Identify what changed, which earlier documents remain applicable and who will verify the altered junction. A past acceptance record describes earlier work; it is not automatic approval of a later modification.
Report newly observed leakage or damage through the relevant service process and retain dates and photographs obtained safely. Avoid filling uncertainty with a product recommendation or an assumption about responsibility. A clear record helps the appropriate providers investigate the actual conditions.
If a skylight sits in the roof being replaced, see our guide to skylight flashing and condensation checks during reroofing before new roofing covers the flashing.
Frequently asked questions
Is sealant alone a complete roof penetration detail?
Ask for the applicable roof-system detail and the role of each specified material. A scope saying only seal penetration does not identify the full assembly, its compatibility or the work needed around it. This guide does not determine the right repair for an unseen roof.
Can a pipe boot be selected from pipe diameter alone?
Request the service identity, actual dimensions, roof assembly and product instructions together. Have the responsible provider confirm the applicable detail and any service-specific requirements before treating a component as suitable.
Does a curb that fits the equipment settle the roof design?
No. Request separate evidence for equipment fit, structural support and roof-system integration, then have the responsible providers coordinate them. Retaining an existing curb also needs a documented condition and reuse decision.
What should the owner receive at closeout?
Request an as-built penetration schedule, final details and material identities, installation photographs, the actual verification record, unresolved items and service or warranty contacts. Tie each document to the same opening label.
Sources and editorial method
Primary sources checked October 28, 2026: Building America, Flashing of Penetrations in Existing Roofs (page updated September 20, 2020); Carlisle’s current accessories overview; Greenheck’s current GPI page and its linked Roof Curbs, Extensions and Equipment Supports catalog, revision 6, November 2019. The catalog is an explicitly dated example, not a claim that every listed specification remains current for an order today.
Manufacturer sources illustrate documentation distinctions and have commercial interests. No comparative testing, product recommendation, specific listing verification, recall clearance or project warranty approval is claimed. The tables and hypothetical handoffs are ClearTrade’s original editorial framework. Obtain current roof-system details and equipment instructions for the actual project.
AI tools assisted research organization and drafting. ClearTrade Report Editorial Team is responsible for the article. The original explanatory graphic depicts a coordination record, not a tested roof assembly or an installation detail.
Need a qualified professional?
Trusted Pros uses visible license-verification states and never ranks paid listings above unpaid listings.